tinymce.init({
    selector: 'css선택자',
    ui options...
});
branding: boolean 값
- false 시 하단의 'Powered by Tiny'문구를 삭제할 수 있다.
- premium 유저들에게만 선택적이다.
draggable_modal: boolean 값
- true 시 생성되는 모달창을 드래그로 움직일 수 있게 된다.
elementpath: boolean 값
- false 시 하단에 표시되는 요소선택자가 안보이게 된다.
font_foramts: 'custom font name=origin font name, sub1, sub2...; other...;'
- 폰트명을 설정할 수 있다.
- 하나의 폰트명에 여러개의 폰트를 정할 수 있고 맨앞의 폰트가 없을 시 뒤에 있는게 설정되는 식이다.
- 폰트명은 띄어쓰기가 사용 가능하고 여러개의 폰트명을 지정할 때의 구분자로는 ';' 세미콜론을 사용한다.
fontsize_formats: '11px 12px 14px ...'
- 폰트크기를 설정할 수 있다.
- vw는 적용됬으나 %는 적용되지 않았다.
- 폰트크기 여러개 설정 시 ' ', ',' 띄어쓰기 또는 쉼표로 구분한다.
resize: 'both' or boolean 값
- 에디터의 창 크기조절 여부를 설정한다.
- 설정 안할 시 세로크기만 조절되고 false시 조절할 수 없게 한다. both는 가로, 세로 전부 조절가능하게 된다.
width: 500 or '50%' or '10vw' ...
- 에디터가 로드됬을 시의 가로 크기를 설정한다.
- number 타입의 값을 넣어도 되고 %, vw의 동적 크기값을 문자열로 넣어도 적용된다.
min_width: number
max_width: number
- 에디터의 최소 가로크기와 최대 가로크기를 설정한다.
- 여기서는 %, vw의 값이 적용되지 않는다.
height: 500 or '50%' or '10vh' ...
- 에디터가 로드됬을 시의 세로 크기를 설정한다.
- number 타입의 값을 넣어도 되고 %, vh의 동적 크기값을 문자열로 넣어도 적용된다.
min_height: number
max_height: number
- 에디터의 최소 세로크기와 최대 세로크기를 설정한다.
- 여기서는 %, vw의 값이 적용되지 않는다.
inline: boolean 값
- 에디터의 메뉴들이 안나타나고 있다가 요소를 클릭시에 메뉴들이 나타나게 한다.
- area, base, basefont, br, col, frame, hr, img, input, isindex, link, meta, param, embed, source, wbr, track, colgroup, opt, ion, table, tbody, tfoot, thead, tr, th, td, script, noscript, style, textarea, video, audio, ifram, object, menu 태그에서는 해당 기능이 적용되지 않는다고 나와있다.
- 모바일 기기에는 지원되지 않는다고 되어있다.

menu: {menu name: {title: 'menu title', items: 'item1 item2 | item3 item4 ...}}
- menubar에 들어갈 요소 및 세부사항을 설정할 수 있다.
- menu name에는 default로 있는 값을 사용하거나 사용자가 커스터마이징한 값을 넣어야 한다.
- title은 사용자가 원하는 값을 작성한다.
- item에 값을 넣을 때 플러그인에 추가를 안했는데 넣으면 자동으로 보이지 않게 된다.
자주사용하는 menu 구성
더보기
menu: {
    file: { title: 'File', items: 'newdocument restoredraft | preview | print ' },
    edit: { title: 'Edit', items: 'undo redo | cut copy paste | selectall | searchreplace' },
    view: { title: 'View', items: 'code | visualaid visualchars visualblocks | spellchecker | preview fullscreen' },
    insert: { title: 'Insert', items: 'image link media template codesample inserttable | charmap emoticons hr | pagebreak nonbreaking anchor toc | insertdatetime' },
    format: { title: 'Format', items: 'bold italic underline strikethrough superscript subscript codeformat | formats blockformats fontformats fontsizes align | forecolor backcolor | removeformat' },
    tools: { title: 'Tools', items: 'spellchecker spellcheckerlanguage | code wordcount' },
    table: { title: 'Table', items: 'inserttable | cell row column | tableprops deletetable' },
    help: { title: 'Help', items: 'help' }
}
menubar: boolean 값 or String 값
- menubar를 표시할지 안할 지 설정하거나 나타내고 싶은 메뉴들을 설정한다.
- false 일 시 메뉴바가 사라지고 String으로 메뉴들의 이름값을 작성하면 작성한 메뉴들만 나오게 된다.
menubar: 'file edit insert view format table tools help'
placeholder: String 값
- 에디터에 아무 글자가 없을 시 표시하게 할 문자열을 설정할 수 있다.
preview_styles: boolean 값 or String 값
- false 시 메뉴바나 툴바에서의 미리보기 기능을 없앨 수 있다.
- String으로 기능의 이름값을 작성하면 해당되는 기능들만 미리보기가 된다.
skin: 'oxide' or 'oxide-dark' ...
- skin의 default값은 'oxide'이다.
- skin은 커스터마이징을 해서 적용시킬 수도 있다.
※ bug : textarea와 inline 방식을 적용한 div 두개를 같이 테스트해보고 있는데 textarea에 dark 스킨을 적용하고 init 메소드를 하는데 자꾸 적용이 안됐다. div의 init을 textarea보다 밑에서 해놔서 그런가 하고 div의 init을 textarea의 init보다 위에서 해주니까 해결되긴 됐다. 선택자가 다른데 왜 이렇게 적용이 되는지는 모르겠다.
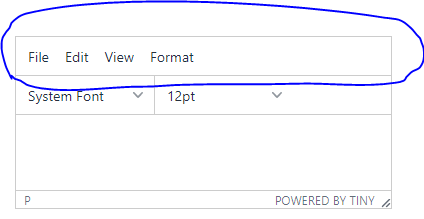
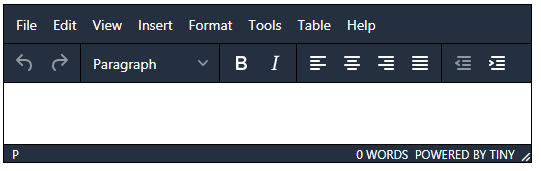
statusbar: boolean 값
- false 시 에디터 하단의 요소 선택 표시, 단어 카운트, 'Powerd By Tiny'가 있는 상태표시줄을 없앨 수 있다.
- 없애면 resize 옵션을 적용해도 사용하지 못하게 된다.
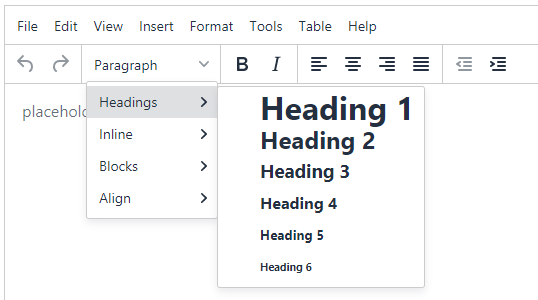
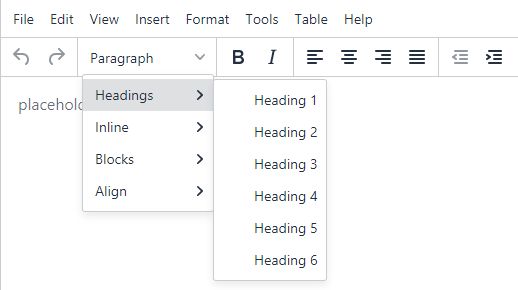
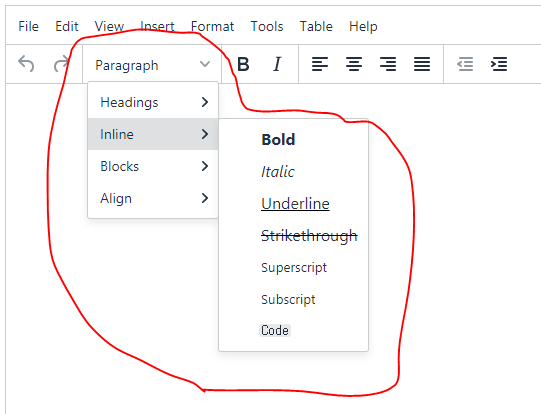
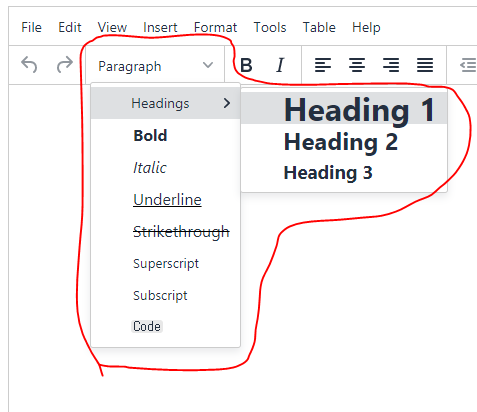
style_formats: [{title: 'title', format: 'style'}, {title: 'title', items: [{title: 'title', format: 'style' ...}] ...]
- styleselect 드롭다운 항목들을 커스터마이징할 수 있다.
- 배열안에 객체로 title 명을 정하고 스타일을 지정하면 적용된다.
- 여러개를 묶어서 사용하고 싶으면 객체에 items 옵션을 줘서 그 안에 다시 객체를 주면 된다.
예제 코드
더보기
style_formats: [
    { title: 'Headings', items: [
        { title: 'Heading 1', format: 'h1' },
        { title: 'Heading 2', format: 'h2' },
        { title: 'Heading 3', format: 'h3' },
    ]},
    { title: 'Bold', format: 'bold' },
    { title: 'Italic', format: 'italic' },
    { title: 'Underline', format: 'underline' },
    { title: 'Strikethrough', format: 'strikethrough' },
    { title: 'Superscript', format: 'superscript' },
    { title: 'Subscript', format: 'subscript' },
    { title: 'Code', format: 'code' }
]
toolbar(n): boolean 값 or String 값 or [String, String ...]
- false 시 툴바를 안보이게 할 수 있다.
- String 값을 통해 커스터마이징을 할 수 있다.
- 값들 사이의 구분자로 ' ' 띄어쓰기를 하고 영역을 나누고 싶으면 ' | ' 파이프 문자를 사용하면 된다.
- 배열로 값을 주면 툴바가 몇줄로 나오게 할지 설정할 수 있다.
- toolbar 키값에 toolbar1, toolbar2 처럼 뒤에 인덱스를 붙여 여러 줄로 나올때의 순서를 정할 수 있다.
toolbar: 'undo redo | styleselect | bold italic | link image'
or
toolbar: [
    'undo redo | styleselect | bold italic | link image',
    'alignleft aligncenter alignright'
]
or
toolbar1: 'undo redo | styleselect | bold italic | link image',
toolbar2: 'alignleft aligncenter alignright'

toolbar_mode: 'floating' or 'sliding' or 'scrolling' or 'wrap'
- 에디터의 크기가 툴바의 크기보다 작아질 경우에 툴바를 어떻게 보여지게 할 건지 설정할 수 있다.
- default는 floating이다. '...'으로 표시된 버튼을 클릭하면 숨겨진 메뉴들이 떠오르듯이 보여진다.
- sliding은 '...'버튼 클릭 시 슬라이딩 애니메이션 효과로 나타난다.
- 'scrolling'은 '...' 대신에 툴바에 가로스크롤이 생긴다.
- 'wrap'은 '...' 대신에 툴바의 줄이 추가로 생긴다.
'Web-Front > TinyMCE' 카테고리의 다른 글
| [TinyMCE] Content appearance options 종류 (에디터에 커스텀 스타일 적용하는 방법) (0) | 2020.05.29 |
|---|---|
| [TinyMCE] Integration options 종류 (0) | 2020.05.27 |
| [TinyMCE] textarea 값 가져오는 방법 (0) | 2020.05.27 |
| [TinyMCE] 라이브러리로 textarea 변경하기 (0) | 2020.05.27 |

